Choosing the right foundation often determines whether synthetic turf feels natural or fails prematurely. The question, “What is the best base for installing synthetic turf,” deserves more than a quick product recommendation. Soil type, drainage, climate, traffic, and turf usage all influence the answer. A residential lawn needs a different structure than a sports field or dog-run area.
Experienced installer Tom Shaughnessy explains, “A strong base creates a stable, long-lasting turf system.” That principle is easy to understand at ground level. Imagine walking across turf after heavy rain. If the aggregate base is poorly compacted, soft pockets may develop beneath your feet. Water can collect there. Edges may shift. Seams can become visible.
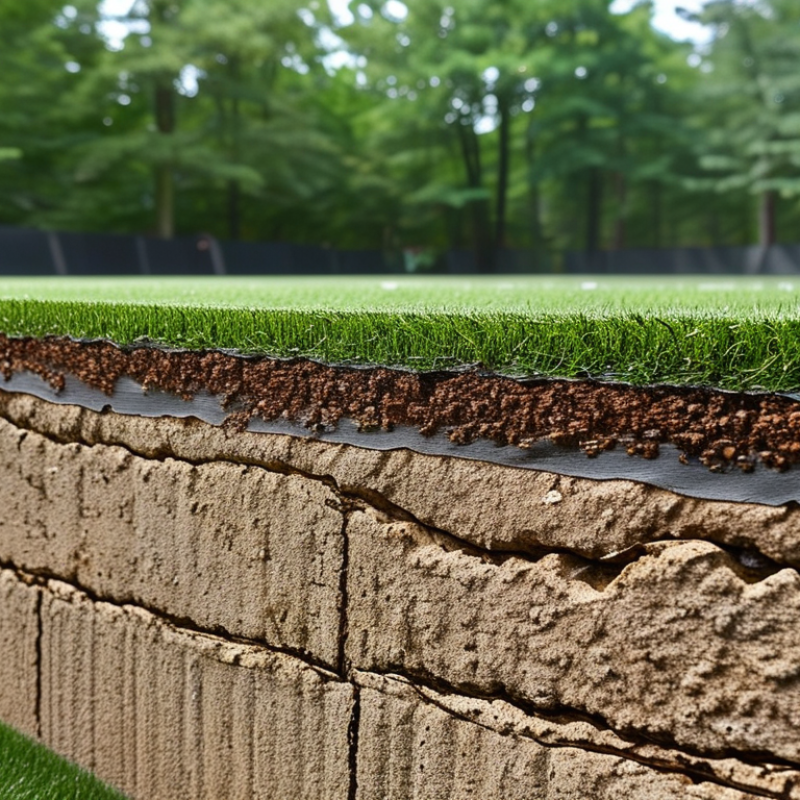
In most installations, a well-compacted crushed aggregate base provides dependable support and drainage. Class II road base, decomposed granite, or similar materials may work, depending on local conditions. The material matters. So does the installation method. Contractors should remove unstable soil, establish a slight slope, spread the base evenly, and compact it in controlled lifts.
Small details matter.
Still, there is no universal base for every project. Clay soil may require deeper excavation. Sandy ground may need stronger containment. Areas with frequent rainfall may need additional drainage planning. Even experienced installers can misjudge soil behavior without testing it first. That possibility deserves attention, not embarrassment.
A reliable decision begins with a site inspection, moisture assessment, and realistic use plan. This guide will compare common base materials, explain their strengths, and identify mistakes that can undermine performance. The goal is not simply attractive turf. It is a firm, dry, comfortable, and durable surface built for real conditions.
Before choosing a base, assess the ground beneath the future turf. Walk the area after rain. Look for standing water, soft patches, tree roots, and cracked soil. Soft spots matter.
Probe several locations with a steel rod or hand auger. Sudden resistance changes may reveal buried debris or weak fill. Clay soils drain slowly, while sandy soils can lose stability during heavy rain. A basic soil test should record moisture, density, grading, and bearing capacity.
Drainage needs local rainfall data, not guesswork. NOAA Atlas 14 provides site-specific rainfall intensities for storm planning. Use those figures when sizing falls, drains, and collection points. The FIFA Quality Programme for Football Turf Handbook uses 180 millimetres per hour as a water-permeability benchmark for tested turf systems. That figure does not guarantee performance when the subgrade is blocked or uneven.
A common compaction target is 95% of maximum dry density, verified through ASTM D1557 testing. It is a useful starting point, not a universal rule. Wet clay may need drying, stabilization, or removal before aggregate placement. Reused fill can look firm and still settle later. I have seen this mistake create ripples across otherwise well-installed turf.
Use clean, angular aggregate with consistent grading. Place it in controlled lifts, then compact each lift evenly. Check the finished base with a straightedge and laser level. Small errors become visible under synthetic turf. Sometimes, removing more soil is wiser than adding more stone.
Assess the ground conditions before installing synthetic turf. A typical granular base is deeper where the subgrade is clay-heavy, soft, or poorly drained. These planning ranges are common residential guidelines; final base depth should be confirmed after testing soil stability, drainage, and compaction.
Firm, well-draining soil may require about 3–4 inches of compacted aggregate base. Clay, weak, or wet subgrades commonly require 4–8 inches, improved drainage, or removal and replacement of unstable soil. The base should be installed in compacted lifts and finished with a stable, well-draining surface.
A synthetic turf base must drain water while resisting movement under foot traffic. Crushed stone usually performs well because its angular particles lock together during compaction. A 100–150 mm layer suits many residential installations, but weak clay soil may require more excavation. The subgrade should slope slightly, often about 1–2%, toward a suitable drainage route. Flat surfaces can hold water beneath the turf.
Decomposed granite creates a firm surface when compacted properly, but its fine particles may slow drainage after heavy rain. Open-graded aggregate drains faster because it contains fewer fines. However, it may need a separate leveling layer for a smooth finish.
Recycled aggregate can reduce material waste, yet its particle sizes and cleanliness vary between suppliers. Ask for a consistent grading specification.
Details matter. On sites I have inspected, poor compaction caused shallow ruts beside gates within months. A plate compactor, used in several passes, helps prevent this problem. Check the base after rainfall, not only on a dry installation day. I once underestimated dense clay and had to rebuild part of the edge. That mistake was avoidable. Sand alone is rarely a dependable structural base because it shifts easily and drains unevenly. Local rainfall, soil type, frost exposure, and expected traffic should guide the material choice. A small test area can reveal more than a confident guess.
How to Choose the Best Base for Installing Synthetic Turf?
Calculate the Required Base Depth for Your Turf Installation
Base depth controls drainage, stability, and the turf’s final appearance. The Synthetic Turf Council’s 2017 installation guidelines state that soil conditions, drainage, climate, and expected traffic should determine the aggregate base. A fixed depth is not always reliable. For residential areas, installers often use 3 to 6 inches of compacted crushed aggregate. High-traffic or poorly draining sites may require 6 to 8 inches, supported by a site assessment.
Measure the installation area and multiply it by the planned base depth. For example, a 600-square-foot area with a 4-inch base needs 200 cubic feet of aggregate. Convert that volume into tons using the supplier’s density, commonly about 1.4 to 1.6 tons per cubic yard. Order 5% to 10% extra for grading losses and compaction. Small errors matter.
Compact the base in thin lifts, usually 2 to 3 inches each. FHWA guidance commonly uses 95% of laboratory maximum dry density for aggregate compaction. Moisture also affects the result. Too dry, and the base may shift. Too wet, and it may pump under pressure. ASTM D698 provides the standard laboratory method for determining compaction targets. In practice, drainage testing is often overlooked. I have seen a smooth surface fail because water had nowhere to go. Perfect calculations cannot repair poor subgrade preparation.
Choosing the best base for synthetic turf begins below the turf itself. In my installation experience, poor preparation causes most surface problems. Remove organic soil, roots, and soft material before shaping the area. A reliable base often includes compacted subgrade, crushed drainage aggregate, and a finer leveling layer. Soil conditions matter. Clay may need better drainage, while sandy soil may require added stability. If water remains after rainfall, stop and correct the slope.
Install and compact the base in controlled structural layers. Spread each lift evenly, usually 5–8 centimeters thick, then compact it before adding another layer. Use several passes with a plate compactor, changing direction between passes. Check the surface with a straightedge and level. It should feel firm, smooth, and slightly sloped for drainage. Light moisture can improve compaction, but saturated material will weaken the base. Edges also need secure restraint. I once rushed a small low spot and covered it too soon. It later became visible beneath the turf. That mistake still influences my inspection process.
Tips: Test the base before turf installation. Walk across it slowly. Soft movement needs correction. Probe questionable areas with a steel rod. Keep aggregate thickness consistent. Do not compact only the surface. Check drainage after irrigation or rain. A clean-looking base may still contain hidden weak pockets.
| Structural Layer | Typical Thickness | Recommended Material Characteristics | Compaction Target | Primary Function | Quality-Control Check |
|---|---|---|---|---|---|
| Prepared Subgrade | Existing soil; remove unsuitable areas as required | Firm, well-drained soil free of organic matter, roots, soft spots, and standing water | At least 90–95% of the applicable maximum dry density, subject to local specifications | Provides a stable foundation and prevents differential settlement | Proof-roll the surface; correct pumping, rutting, and soft zones before placing aggregate |
| Geotextile Separation Layer | One continuous layer where soil migration is a concern | Permeable, nonwoven or woven geotextile selected for soil conditions and drainage requirements | No separate compaction; install flat without wrinkles or gaps | Separates subgrade soil from aggregate and helps maintain drainage performance | Overlap seams according to project specifications and secure edges against movement |
| Primary Aggregate Base | 100–150 mm (4–6 in) for many residential installations | Well-graded, angular crushed aggregate with a controlled range of particle sizes | Compact in lifts no thicker than approximately 75–100 mm (3–4 in); target about 95% maximum dry density where specified | Creates load-bearing strength, drainage capacity, and resistance to rutting | Check finished grade, cross-fall, thickness, moisture, and surface firmness after each lift |
| Secondary or Fine Aggregate Base | 25–50 mm (1–2 in), when needed for leveling | Clean, compactable fine aggregate compatible with the drainage design; avoid excessive fines | Compact uniformly with a plate compactor or roller appropriate to the site | Fine-tunes the surface profile and provides a smooth installation plane | Use a straightedge or screed to identify depressions and high points; recompact repaired areas |
| Edge Restraint Support | Flush with the planned turf surface | Durable edging or treated structural border suitable for outdoor use and local conditions | Firmly anchored; adjacent base compacted without voids | Prevents lateral movement and keeps the turf perimeter secure | Confirm alignment, elevation, anchoring, and drainage openings before turf placement |
| Turf Installation Surface | Final surface set to the planned finished elevation | Smooth, dense, stable, and free of sharp stones, loose debris, and visible wheel or foot impressions | Final pass with suitable compaction equipment; do not overwork or seal the surface | Supports uniform turf appearance and reduces wrinkles, settlement, and uneven wear | Verify slope, drainage flow, level tolerance, and surface smoothness before rolling out turf |
Inspecting the finished base is the most important step before laying synthetic turf. A beautiful surface cannot hide poor preparation for long. Soft spots create ripples, while high areas become visible through the turf. Walk the entire area slowly. Watch for pumping, loose stone, standing water, and sudden changes in level.
Use a three-metre straightedge to check surface tolerance. Many installation specifications allow no more than 6 millimetres of variation beneath the straightedge. Confirm compaction with an ASTM D698 Standard Proctor test. Many civil projects target at least 95% of maximum dry density, although local engineers may require different values.
Drainage should also be tested after rain or controlled watering. Water must leave the surface, not collect beside edging.
Tips: Mark every soft spot with paint. Repair it before continuing. Use a plate compactor carefully. Excessive vibration can shift aggregate instead of strengthening it. A proof-roll with a loaded utility vehicle can reveal weak areas, but it is not a substitute for density testing. Check the finished slope with a laser level, then photograph the readings for project records. ASTM D6938 field-density testing can provide additional verification when the base looks firm but feels uncertain. This matters because visual inspection alone can miss hidden voids. I have seen bases that appeared perfect at midday but settled after the first wet week. That possibility deserves attention.
: Walk the area after rain. Look for standing water, soft patches, tree roots, cracked soil, and uneven ground. Probe several locations with a steel rod. Sudden resistance changes may reveal buried debris or weak fill. Small soft spots matter.
Clay soil drains slowly and may need drying, stabilization, or removal. Sandy soil can lose stability during heavy rain. Reused fill may appear firm but settle later. It can look fine. That is misleading.
Use local rainfall records instead of guesswork. Size slopes, drains, and collection points for realistic storm intensity. A tested turf system may allow about 180 millimetres of water per hour. That figure means little if the subgrade is blocked or uneven.
A typical base includes compacted subgrade, crushed drainage aggregate, and a finer leveling layer. Remove organic soil, roots, and soft material first. Place aggregate in controlled lifts, usually 5–8 centimetres thick. Compact every lift before adding another.
Spread the material evenly and use several compactor passes. Change direction between passes to reduce missed areas. Light moisture can improve compaction, but saturated material weakens the base. Do not compact only the surface.
Many projects target at least 95% of maximum dry density. This is a useful starting point, not a universal requirement. Local soil and engineering conditions may demand different values. Testing is better than appearance.
Walk across the entire surface slowly. Watch for pumping, loose stone, standing water, and sudden level changes. Use a three-metre straightedge. Many specifications allow no more than six millimetres of variation. Check slopes with a laser level. Mark every soft spot.
Test the surface after rain or controlled watering. Water should leave the area, not collect beside the edging. Density testing can confirm whether firm-looking areas are actually stable. A loaded utility vehicle may reveal weak zones, but it cannot replace density testing. Visual checks miss hidden voids.
Choosing the right base is essential for a stable, durable, and well-draining synthetic turf installation. Begin by assessing the ground conditions, including soil type, moisture levels, slope, and existing drainage issues. Remove unstable soil, roots, debris, and organic material before preparing the area. When comparing base materials, consider their ability to support weight, promote drainage, resist shifting, and remain durable over time. What is the best base for installing synthetic turf? In most projects, a properly graded mixture of suitable crushed aggregate provides a dependable balance of strength and drainage, but the ideal material may vary according to local soil and weather conditions.
Determine the required base depth based on soil stability, expected foot traffic, climate, and drainage needs. Install the base in evenly distributed structural layers rather than placing it all at once. Lightly moisten and compact each layer thoroughly to eliminate soft spots and reduce future settling. Finally, inspect the finished surface for consistent depth, proper slope, firmness, and smoothness. Correct any low areas or loose sections before laying the turf to create a reliable foundation and a cleaner, longer-lasting result.

Purely Plants